Some paintings, like some people, you just don’t want to let go. I surely didn’t want to let Bill go. We met at a Wednesday painting group on Cape Cod, all of us painting, teasing, critiquing, and sharing what we knew. During the two plus years we both attended, Bill and I became friends.
When I asked him to pose for me in his matching Christmas fedora and shirt, he said yes. We spent a wonderful afternoon in the sun while he spun stories and I snapped photos like some insane fashion photographer. He never told me he wasn’t feeling well. Instead, like always, he spent the time making me laugh. Not to be outdone, I did my best to return the favor. This is from one of the photos from that gloriously silly day.
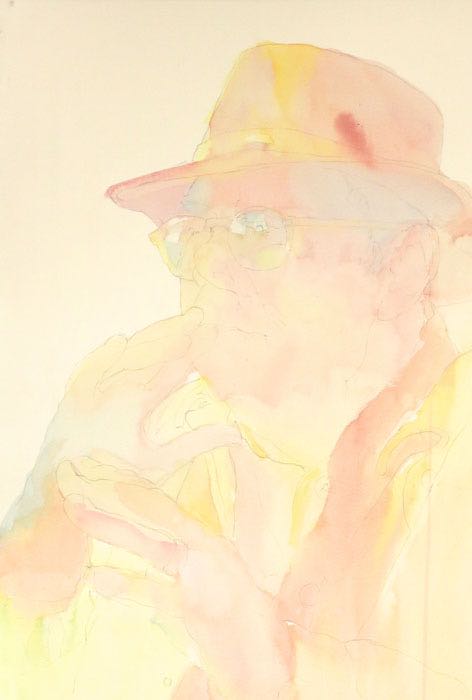
Sunlight was going to be important, yet I wanted to capture the rich softness of his felted hat, flannel shirt, and chamois shirt-jacket, so I used my true primary yellow and Naples yellow (Quiller) in sunlit areas, and cadmium red on the shirt and hat. Because of his very fair skin, the skin tones include those same colors plus some quinacridone rose and pthalo blue.
Once the first wash was dry, I put in a second wash to bring the background and subject together. Most importantly, though, I added more intense cadmium yellow light wherever I wanted the light to glow. Now you can see the importance of those first touches of blue in his glasses to indicate both reflections and his eyes as they are refracted through the lenses.
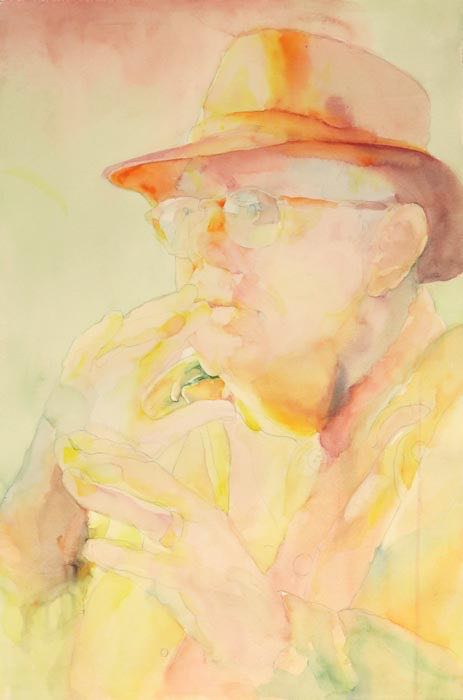
The intensity of yellow is very important in achieving the effect of sunglow, which is why I’ve included this extra step in Bill’s demo. The yellow must be graded gradually from very light to very intense. Otherwise, it won’t show through subsequent glazes properly to get the glowing effect. Keep watching what happens to the yellow-painted areas compared to the areas I didn’t glaze yellow into.
Usually, I paint the eyes at this point because I need something to gage my color and value choices against. The glasses warped Bill’s eyes too much to work that way, so I found myself adding in some shadows, the glasses frames, and his chin, where I brought my first green into the painting.
While there’s a lot of glazing in the skin and chamois jacket, I started this glaze wet-on-dry with the reds of Bill’s hat and shirt. I call this process direct painting. Things get wild when I direct-paint because I’m going in with what I think will be my darkest darks and the attitude that I’m going to finish whatever section or piece of clothing I’m working on.
Working at a steep slant (about 45 degrees), I started fairly thickly at the top of his hat with my cadmiums. I was careful to leave some of the previous intense yellow glaze showing at the shadow’s edge, then I worked toward the back of his hat and downward using increasingly red cadmiums. Where the shadows deepen, I added some ultramarine blue to the cadmium red.
Still painting wet-on-dry to maintain hard edges where I wanted them, I worked rapidly, pulling the intense pigments downward and allowing them to melt into each other as I went. (Note: If I simply Must stop partway through, I end at a section edge where there will be a hard line so the softness of the hat’s fabric isn’t destroyed. That said, though, it’s best if you keep on going so your colors are all cohesive and your edges melt nicely where you need soft lines, like there in the transition between Bill’s hat brim and his temple.)
Then I kept working my way down the back of his neck and into his red flannel shirt.
Here’s where the going got rough. I wanted a different red background shape at the top than the one shown here.

The background red had already dried, but no problem. I just pulled out my adjustable spray bottle and sprayed the red loose. Or I tried to. Usually, this works quite well on Saunders Waterford paper because it’s sized internally and externally. Unfortunately, there were invisible sizing problems and some kind of machine marks from the manufacturer’s mill on this sheet there at the top. The paper took the original application of red paint well, but when I sprayed it, all kinds of weird marks were left behind.
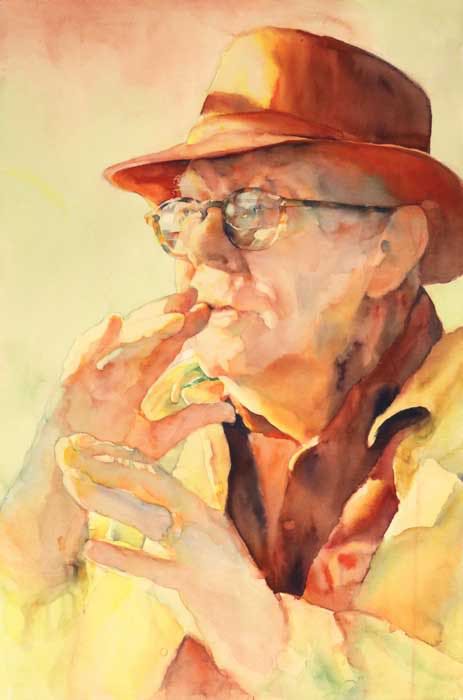
Well, you know me and mistakes. I loved what I’d already done, so I changed my plan. I added more green up in the background to pull the red toward browns and greens in a shape that would work compositionally, then brought the green on down through the painting as I had intended originally. I just had to make the painting darker and more detailed than I had intended, which necessitated making it more realistic.
There’s nothing wrong with that; it just wasn’t the painting I had in mind when I started. Still, I didn’t want to loose whatever freshness I could keep, so I stopped, let it dry, then looked at it in black and white to make decisions about what it needed for compositional balance.

The black and white photo showed me where and how much I needed to darken things to tighten up the composition and so the upper background wouldn’t stand out. To get better connection of the figure to the painting’s bottom, I brought more darks and therefor more detail into the hands. It also brought a good deal more drama to Bill and the story he was telling.
Having added so much red to the figure, I had to tone down the upper green background with another light glaze of red. It was tricky because how the paper took the paint was very unpredictable, but I got it to work.
Now let’s talk about painting eyeglasses. First and foremost, Paint What You See, not what you think you should see. Curved glass warps whatever is behind it. That includes eyes. So paint shapes and values and colors, not eyes. The second most important thing is edges: they Must be a mix of lost and found. And thirdly, glass reflects, and the reflection almost always wipes out some of what’s underneath. Leave them white or, as in this case, very light blues and yellows. Use the reflected colors you actually see, not the skin tones that you know lie underneath.
I am honored to say that even though I expected and wanted to keep this painting, Bill’s family purchased it. And that’s the point after all, isn’t it? Paintings exist to touch others’ hearts, not just your own.
Main Near-Triad:
Cadmium red (Quiller brand)
Permanent green light (Quiller)
Ultramarine blue (Quiller)
Along with:
Cadmium yellow light (Quiller)
Naples yellow (Quiller)
Cadmium red light (Quiller)
Cadmium red (Quiller)
Quinacridone rose (Quiller)
Magenta (Quiller)
Pthalocyanine blue (Quiller)
